

Last week was HackWeek at Square, and as usual I took the opportunity to stretch my maker legs. This time I decided to tackle a practical problem that’s on my horizon – or perhaps more accurately, in my peripheral vision.
My current workstation has two Apple Thunderbolt Displays. This is, as you might imagine, awesome. There’s tons of desktop real estate to lay out browsers and code and terminals. However, this setup does have a dark side: it’s 50″ wide! Not only does this require me to pan my head to see the far edges of the most distant windows, but it’s actually wider than the desk space allotted to me. As soon as someone moves into the vacant spot next to me, one of these bad boys will have to go.
Faced with the prospect of giving up one of my beloved monitors, I hatched a plan to rotate them both from landscape to portrait. The traditional way to achieve this sort of thing is through the magic of the VESA mount. A lot of monitors have this built in, but not Apple displays. (After all, who wants to see a bunch of extra screw holes on the back of their perfectly sculpted monitor?) Apple sells an add-on VESA mounting kit, which is apparently an enormous pain in the butt to install. (You know it’s a bad sign when a how-to includes fast motion.) Luckily, the Square IT team had a pair of the older Cinema displays with the
VESA mount already attached so I could experiment.
Once your monitors are ready to be mounted, you need a stand. There are commercially available stands of all sorts, but that’s no fun, so instead I designed a custom stand using my favorite tool of choice, OpenSCAD. I wanted something that would be cheap to fabricate and easy to assemble that would still turn out handsome and sturdy. This led me to choose laser-cut birch plywood and the standard T-slot style screw-together construction.
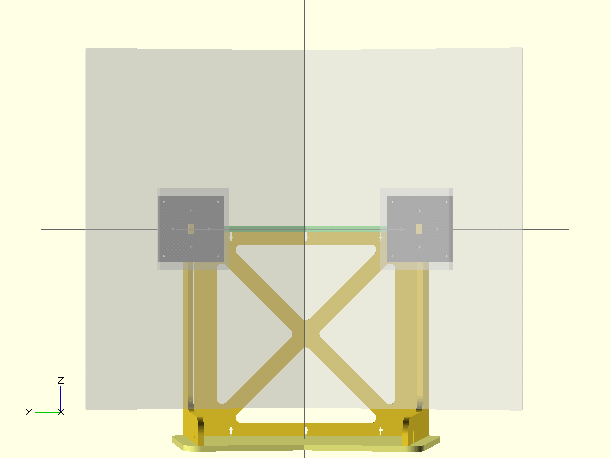
By far the hardest part of this project was getting all the geometry correct. I wanted the monitors to come together very precisely, so I had to lay out the mounting points by carefully computing a bunch of different angles. There were more than a few head-scratcher moments spent hunched over a notepad. (Lesson learned here: start your sketches much bigger than you expect if you’re planning to add a lot of little annotations for angles and segments.)
This version seems to work pretty well, though I’m still planning to to a nice sanding, staining, and clear-coating pass to make it extra presentable. I also set my personal best for time from conception to realized prototype – I started sketching on Tuesday afternoon and had the stand built by noon on Friday.
As usual, all the project files are available on my GitHub page. If you’re thinking of making one, let me know!

Pingback: Hackaday Links: Sunday, June 23rd, 2013
Pingback: rndm(mod) » Hackaday Links: Sunday, June 23rd, 2013
Pingback: Hackaday Links: Sunday, June 23rd, 2013 - RaspberryPiBoards
Pingback: Hackaday Links: Sunday, June 23rd, 2013 | Blog of MPRosa
Pingback: Hackaday Links: Domingo, 23 de junio 2013 - | Indagadores |Seguridad informatica |Seguridad en internet
Pingback: Hackaday Links: Sunday, June 23rd, 2013 | Techno Alchemy
Pingback: Hackaday Links: Sunday, June 23rd, 2013 | Make, Electronics projects, electronic Circuits, DIY projects, Microcontroller Projects - makeelectronic.com
I’m considering putting one of these together. It’s been almost 2 years — are you still happy with the design? Is there anything you’d change for v2?
Thanks for publishing this!
I would make the angle between monitors much closer to flat than the current ones. I’d make the stand shorter so the monitors are almost touching the base – the thing is insanely tall otherwise! Also, the inside bottom corner monitor mounting screws aren’t reachable from the back with the monitors on, so I’d add some access holes to the back panel.
The exhaust ports for the thunderbolt displays are on the bottom I believe? Are they still mounted bottom to bottom, and if so has heat been an issue?
Hi
I like your effort and design. My first cut tonight was just to lean my 2 monitors against the wall and program for a while. They are back to landscape now. I got a feel how nice portrait will be now. I have some interest in the sit stand mode of working but for now just need dueling portraits.
I don’t think I have your mechanical engineering skills but if I come up with or use your design I’ll let you know.
Art